My name is Shannon "Dabling" hence the title :) I am a mother of 3, stay at home mom, Creative Memories Consultant, and photographer. I have been a consultant twice so far, and have had my home photography studio for 7 years.


My goal for the year 2010 is to "Focus on Photos" and my mission is to help others with the same goal.

I love what I do and have met the most wonderful people through both of my business's. I hope that I can continue helping others.

Thank you for visiting my blog. If you have any additional questions my email is spdabling@msn.com.


Showing posts with label Storybook Creator Plus. Show all posts

Creative Memories Storybook Creator Plus 3.0 new cutting tools

Tech Tips

blog - Page 009Under the new Cut & Fill tab you will  see new options for cutting and cropping.

Cut and fill

Looks about the same, but see all those little arrows, there are some awesome new options there.

So lets dive in some more....

There are some awesome new options with the straight tool... (pretty self explanatory)

straight

Of course our standard shapes but the new edition is the custom. And here is my confession, I was never NEVER (at all) good with the wand. This just made my life easier.

custom

so now you can control your cut, point by point! Its amazing!!!!

moving on to More...

more

WhoHoo!!! I won't even go into details about what I would go through to get a rounded corner. This is amazing and even more than you see. There are several corners to choose from. And you have the ability to get very creative with this tool. You can choose which corners and the size of the cut. And this also works on papers..etc.!

corner

Well Creative Memories, I think you have out done yourselves!!! And this is only the tip of the iceberg


Now the upgrade is $9.95 for a limited time and then goes up to $19.95! So get going and head over to my site to get the upgrade!!! (available on a disk or as a instant download)

www.mycmsite.com/shannondabling


Happy Cutting


Shannon

Baby Club Album

This is a 8x8 album that my clients receive when they sign up for the baby club. They receive photo sessions throughout the baby's first year and at the end of that year they receive a book with complied images from all the sessions. This is the first one that I designed in Storybook Creator Plus.

Here are the pages layout as two-page spreads for posting reasons. But when I made this book I used a normal 8x8 page layout for when I order it.

1

2

3

4

5

6

7

8

9

10

12

13

14

15

16

Making Dingbats into Embellishments in Storybook Creator Plus

Tuesday Tech Tip

Dingbats are a font that uses shapes instead of letters.

First, Check out these free sites that have LOTS of dingbats

www.dafont.com

http://www.urbanfonts.com/free-dingbats.htm


Download a dingbat font to a folder or your desktop. It will be a zipped folder so you will have to right click and extract the folder.

extract

Then go to the Control Panel and open your Fonts folder. Then open the new extracted folder and grab the TrueType Font file and drag it into the Fonts folder and your new font will install. You can now delete the folders you just downloaded from the website.

font

Now open your Creative Memories Storybook Creator Plus Program. Choose Open or Create a New Project.

On a Blank Page, Create a Text Box.

Then select the new font you just installed from the font menu. It will not show the name of the font but you will see the images and it will be in the alphabetical order of the name of the font.

font2

Then type out the Alphabet A-Z.

You will be able to see all the different dingbats because each one is a different letter.

Tip: a space between each letter will make it easier when we cut them out.

t

Now Flatten the text box from the Layout Bar. Now you can adjust the size by dragging the corners.

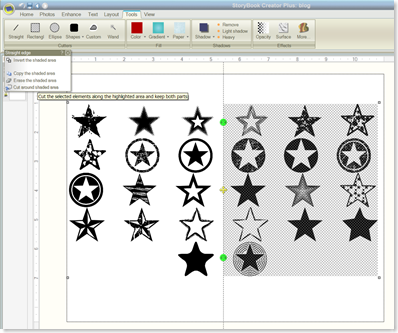
By using the straight cutter tools crop the stars out in a grid pattern first by column and then by row. Then choose the option to "cut around the shaded area."

Tip:  Make sure you you have all the layers selected in the row or column you are cropping.
crop

crop2

Once your done each star should be an individual element.

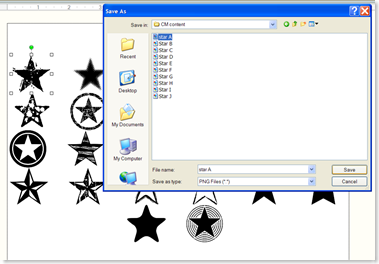
Then you will save and name each one by selecting one at a time, right click and choose "Save Selection"

I named them by type and letter. So the first Star is made by the letter A, so I named it Star A.

Tip: I saved all of these into a folder that I created for all my CM stuff called "CM Content"  in My Documents>Creative Memories and I always use this folder to download stuff that I will be using for SBC+
name1

Now you have to bring these into the program by going back to the Home screen. Select the 'My Stuff' icon from the top left-hand corner.

mystuff

Select File>Add Collection

collection3

Then give it an appropriate name. I would suggest using the term dingbat so you remember where you got them later. So I named mine Dingbats-Stars.

Then go to Content>Add Embellishment, browse for the folder where you saved your dingbats.  Then 'Get all embellishments'
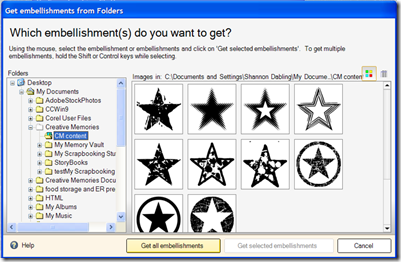
collection2

Now all these Dingbats will be available in any project from the Embellishments Panel.

And now you can use them on any page, fill with color, paper, change the opacity, etc.

embelishment

Hope you enjoyed this Tutorial on Using Dingbats. As always I love to hear your feedback in the comments section of the post.


Happy Creating

Shannon

Creating Templates in Storybook Creator Plus (Part 1)

Tuesday Tech Tips:

There is a way that you can create your own templates in Storybook Creator Plus.

I saw a similar layout in a scrapbooking magazine, so I created my own version in SBC+.

Temp1 - Page 001 T1 - Page 022

Here are the first steps for creating your own page templates.

1. Create a New Project

create

2. Choose your page size. Remember you can only use your template in a project using the same page size. So I chose a 12x12 page print using blank pages (I did not choose a storybook because I will be importing these pages and will not need a cover option.)

pages

3. Name this project "Templates"

This will be the project that you will always use to create new templates.

name

4. Then your project will open.

5. Start with something easy. Just create a square shape in a shade of gray. Select the shape menu from the side bar. Click the arrow next to the square shape and pick create a shape. From there just make your shape any size and select a shade of gray by clicking the color box icon.

shape

6. Keep creating shapes and keep building your template...

add2 add1 more

7. Don't forget to add an add photo box. Decide what size you want and where you might want a photo

tip: if you hold down the shift key while changing the size of the box, (or any image or element) it is a shortcut key for unlocking the aspect ratio (unlocking the size).

addphoto

8. Add titles and text boxes.

text

9. Try adding drop shadows, embellishments, different size photo boxes, etc

10. When you are satisfied, save your page.

Now that you are done with this page... Remember DO NOT add paper, color, or photos to this page in your template project.

In part 2 I will show you how to import this page into a different project. And how to fill with colors, papers, and images.

Happy Creating

Shannon

Monday: Product Review

The product review for today is the School Power Paletts and Digital Kits.

With school just around the corner, I know I am getting ready to get more scrapbooking done. I really want to finish up last year so that I am not getting behind. While Maddie is my only one in school I think it will be a great idea to not get behind! (true intentions)

So with back to school night coming up me and my daughter sat down and made this little card for her teacher from the School Digital kit.

Invitations - Page 001

There are so many uses for this program! Keep the ideas coming.

Shannon

Tuesday: Tech Tips "Released Today"


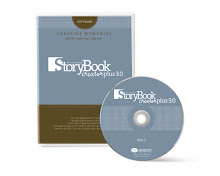
"Yes" the new Storybook Creator Plus Software was released today! This is such an awesome software. It is so user friendly with all the features you need to create a digital photo album. I know this is going to have a great reception. Here is the ad of the actual page on Creative Memories Website


Digital scrapbooking with
StoryBook Creator Plus

You’ll love turning your digital images into something you can share and celebrate with our new StoryBook Creator Plus Software.

Exclusive to Creative Memories, this digital scrapbooking software comes with two digital kits and two customized templates.

Customized templates start with ready-made pages and give you plenty of flexibility to add, move, enhance or delete design elements to create your own look.

Digital kits offer you a true digital scrapbooking solution: create pages from scratch by choosing your background and then arranging photos, journaling boxes and embellishments as you’d like.

Snatch up StoryBook Creator Plus and get started today.


The price on this software is amazing $59.99 about 10% of what I paid for my original version of photoshop! 10% ! Don't miss out contact me today!